

Filling and Sealing Machine Factory Processes That Boost Packaging Quality
2026-11-18
Packaging quality rarely comes down to a single machine. It is the result of how a filling and sealing machine factory controls every stage—from material handling and precision machining to assembly, calibration, and final testing. When these processes are inconsistent, brands face leaking containers, uneven fill levels, weak seals, and costly recalls. That is why Wanying Machinery focuses on factory-level discipline rather than isolated fixes. In this article, we look at the specific production and quality-control steps that separate dependable packaging lines from the rest, and how they directly shape the performance of filling and sealing equipment on your floor.
Where Fill Accuracy Begins Before the Nozzle Opens
Most people assume a precise fill starts the moment the product leaves the nozzle. In practice, the real work has already happened upstream. From the pitch of the tank to the twist of the manifold, every small geometric variation quietly determines how the fluid gathers speed, separates, and lands. By the time the valve lifts, the stream's shape has largely been decided. That is why we focus on the quiet details most lines never inspect.
One overlooked factor is the amount of air trapped in the product before the nozzle even engages. Trapped micro-bubbles change the apparent volume, shifting the cut-off point in ways a scale cannot explain. Instead of chasing tighter sensors at the fill head, we study the movement of liquid inside the pipe long before it reaches the opening. The result is a fill that looks the same every time because it starts from the same hidden condition.
Temperature also plays a role earlier than many realize. A slight difference in product temperature at the start of the run changes viscosity, which changes how the stream breaks after the nozzle closes. We treat temperature balance as part of fill accuracy, not a separate quality check. When these upstream variables are held steady, the nozzle simply finishes what the system already prepared.
Seal Inspection Points That Catch Flaws Early
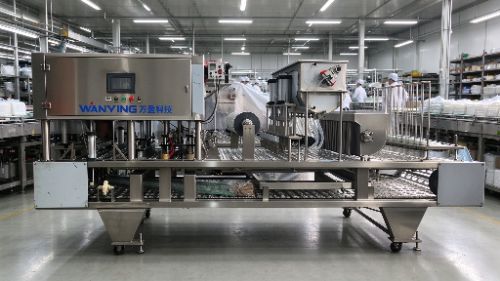
A quick look at the seal lip can reveal a lot before installation even begins. Run a fingertip along the inner edge and watch for nicks, cuts, or uneven wear patterns that might not show up in a standard visual check. Minor surface scratches often turn into leak paths once the shaft starts rotating under load, so catching them at this stage saves a frustrating teardown later.
Pay attention to the seal's outer diameter as well. If the coating is scuffed, dented, or has areas where the rubber has peeled away from the metal case, the seal may not seat properly in the bore. Even a slight gap here can allow oil to seep past the outside edge, giving the impression of a failed lip when the real problem is installation damage.
Finally, flex the seal gently between your fingers to expose hairline cracks hidden in the flex zone. A seal that feels stiff, brittle, or shows tiny fissures after a light squeeze has likely been sitting too long or exposed to heat. Replacing it before it goes into the housing is far cheaper than chasing a slow leak after the machine is back in service.
Keeping Containers and Product Free of Hidden Contamination
Most contamination never announces itself. It hides in threads, under gasket lips, and at the bottom of valve stems where a routine rinse cannot reach. If the same container design keeps failing a sterility check, the issue is rarely the wash cycle itself. More often it is a slow buildup in a dead leg or a worn O-ring that sheds particles only when the line runs hot. Pull apart a few units after cleaning and swab the spots nobody photographs for the audit.
The product can also work against the package. Acidic formulas, alcohol-heavy liquids, or fine abrasive powders gradually attack inner coatings, creating micro-cracks that trap residue and breed bacteria. Glass delamination and pinhole corrosion in foil seals are not dramatic events; they appear as faint haze or a slightly rough surface. Before filling, inspect a sample under angled light and ask the supplier for migration data on the exact formula, not just a generic compatibility sheet.
Clean packaging means little if the surrounding air and handling tools carry spores or fiber. Compressed air lines often collect moisture and oil mist, while conveyor rollers and operator gloves transfer whatever they touched earlier in the shift. Swapping to filtered, dried air and keeping a simple contact-plate schedule for tooling can catch trouble before the batch leaves the dock. Move the sampling points around occasionally so the monitoring itself does not become a routine that misses the same corners.
Calibration Routines That Prevent Gradual Drift
Drift rarely announces itself. It creeps into readings as tiny, almost invisible shifts—a sensor warming past its comfort zone, a reference resistor aging, a mechanical zero point settling further from where it started. Without a routine, these fractions add up until the instrument reports a confident wrong answer. The fix starts with rhythm: short, scheduled checks against a known standard, done at the same warm-up interval every time. A five-minute verification at the beginning of a shift does more than catch errors; it teaches you how a device tends to wander.
A practical calibration loop covers three points instead of one. Capture the low end, the mid-range, and the high end of the operating span, then compare each against a reference that itself gets recalibrated on a longer interval. Log the raw deviations, not just pass or fail flags. Over a few weeks, those logs reveal whether drift is linear, temperature-linked, or tied to loading. When the mid-point starts leaning consistently in one direction, you can adjust the offset before it becomes a field failure.
The final layer is environmental discipline. Keep calibration standards away from direct airflow, vibration, and voltage swings, and give instruments a fixed idle state between runs. For equipment that drifts under thermal load, add a short cool-down or soak step before verification. Once a pattern is visible, tighten the interval only for channels that show real movement—leaving stable channels alone prevents unnecessary wear and keeps technicians focused on the measurements that actually need attention.
Matching Line Speed to Fill Tolerance Without Sacrificing Either
Running a filler at higher speeds usually exposes the weak points in the fill system long before it exposes the motor. The real constraint is rarely the conveyor; it is the lag between the cutoff signal and the actual product flow, especially with foamy or shear-thinning liquids. If you tighten fill tolerance while holding the same line speed, you often end up with more short-fill rejects. If you push speed without adjusting valve timing, overfill giveaway climbs quietly. The trick is to treat fill accuracy and line speed as one tuning problem rather than two separate targets.
One practical approach is to measure the fill-to-signal delay at the target speed before changing anything else. A nozzle may need a few milliseconds more or less after the weight setpoint is reached, and that lag shifts with product temperature, viscosity, and tank head pressure. Adjusting the pre-shutoff point, instead of simply shortening the fill window, can hold tolerances at higher speeds. It also helps to track short-term sigma for each nozzle rather than just the line average, because a single drifting valve can drive most of the rejects while the overall mean looks acceptable.
Once the filler is stable, build a feedback loop from the checkweigher that trims the target fill in small increments. That lets you recover product loss without slowing down every time a batch changes. When a new container or formulation arrives, run a stepped speed trial and find the highest stable speed at the required fill volume. Leave a small margin below that speed so normal variation does not push the line into constant alarm states. This way the line speed and fill tolerance stay matched, and neither is treated as a fixed number.
Changeover Cleanliness That Protects the Next Batch
Clean equipment isn't just a visual standard; it's the invisible line separating one product from another. Residues that survive a rinse cycle can interact with new ingredients in ways no specification sheet predicts. Instead of assuming a generic wash handles everything, teams start by mapping which compounds actually touch shared surfaces, then match cleaning agents and contact times to those specific risks.
The hardest part is usually validation, not chemistry. Swab results look good until someone checks a hard-to-reach gasket or a transfer line that only carries product for twenty seconds per batch. A robust changeover protocol treats those overlooked spots as the real test. Operators who document what they see, not what the procedure claims, quickly learn that a dry, odor-free surface is only the starting point.
What keeps the next batch safe isn't a longer checklist but a shorter gap between what cleaning demands and what people can actually verify. When the focus shifts from completing steps to understanding why each residue matters, changeover stops being a burden and starts acting like a quiet quality gate.
FAQ
Filling head alignment, jaw parallelism, and dwell-time tuning tend to matter more than brand-name components. We measure seal strength at multiple points after every tooling change because a machine can look aligned on the bench and still produce weak corners under production speed.
The changeover includes a short calibration run with water or a surrogate liquid, then operators weigh a sample of fills and adjust the piston stroke or flow meter offset before the real batch starts. That physical check catches drift that a digital setting alone won't show.
Film rolls that sit in an uncontrolled staging area can pick up moisture, static, or edge damage. Factories with tighter quality keep materials in conditioned storage, inspect roll tension and core condition at receiving, and reject damaged outer wrap before it reaches the forming station.
It's less about the room class and more about movement discipline: restricting traffic near open product, wiping contact surfaces between batches, and keeping washdown residue off sealing jaws. Even a modest clean area works if the workflow doesn't drag floor-level dust toward the fill zone.
The machine runs a sustained trial using the customer's actual container and product or a close stand-in. Technicians log fill weights, seal appearance, and any jam events, then adjust timing, temperature, or guides until the results stay inside the agreed tolerance across the trial length.
Checking seal jaw flatness, replacing worn gaskets and filling nozzles, cleaning sensors, and verifying heater calibration on a set schedule. A lot of quality problems appear gradually, so the factory keeps a log of small adjustments to spot a part wearing out before it causes a full stoppage.
They start with a narrow temperature and pressure window from the film supplier, then run a matrix of short test seals. The chosen settings aren't just the ones that look good immediately; they also pass a pull test and hold up after a cool-down period, which catches seals that set weak.
Beyond visual inspection, operators may use squeeze tests, vacuum decay, or dye penetration on sample packages. The pass/fail standard is tied to the intended shelf life and transport conditions, so a container that survives a warehouse might still be rejected if it doesn't meet the customer's distribution stress.
Conclusion
Packaging quality in a filling and sealing machine factory rarely comes from a single adjustment on the line. It starts before product ever reaches the nozzle—fill accuracy depends on consistent product temperature, degassing, back pressure, and nozzle condition, not just valve timing. Once containers move into sealing, early inspection stations that check seal alignment, jaw temperature, and dwell pressure catch small flaws that would otherwise become leakers after shipment. At the same time, protecting containers and product from hidden contamination calls for controlled air flow, rinse-and-blow sequences, and careful handling of caps and closures before they enter the filling zone.
Beyond those controls, long-term consistency depends on calibration routines that compare fill weights, sensor readings, and seal parameters against traceable references on a fixed schedule, so gradual drift gets corrected before it affects output. Lines are then tuned so speed and fill tolerance work together—valve response, settling time, and conveyor pacing are adjusted as a set rather than pushing one variable at the expense of the other. Finally, changeover cleanliness is treated as part of the process, with dedicated cleaning, flushing, and verification between batches preventing residue, flavor, or allergen carryover into the next run. These connected habits do more than maintain settings; they keep packaging quality stable across shifts, products, and seasons.
Contact Us
Contact Person: Tyson
Email: [email protected]
Tel/WhatsApp: +8613396971296
Website: https://www.wanyingmachinery.com